 80 minutes
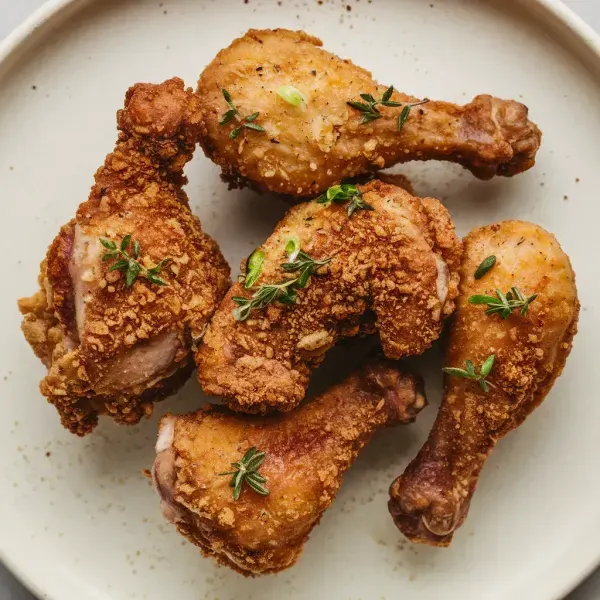
A deliciously crispy fried chicken recipe soaked in buttermilk for extra tenderness and flavor.
Whole Chicken, cut into 8 pieces
0 lb
cups
tablespoons
cups
teaspoons
teaspoons
teaspoons
teaspoons
cups
1. Cut the Chicken
Begin by cutting the whole chicken into 8 pieces: 2 thighs, 2 drumsticks, and 4 breast pieces.
2. Prepare Buttermilk Mixture
In a large bowl, whisk together 2 cups of buttermilk and 2 tablespoons of salt until the salt has dissolved.
3. Marinate the Chicken
Add the chicken pieces to the buttermilk mixture, ensuring they are well-coated. Cover the bowl with plastic wrap and refrigerate it for 1 hour.
4. Prepare the Coating
Whisk together 3 cups of flour, 2 teaspoons of baking powder, ¾ teaspoon of dried thyme, ½ teaspoon of pepper, and ¼ teaspoon of garlic powder in a separate bowl. Add 6 tablespoons of buttermilk to the dry mixture and rub it with your fingers until the texture resembles coarse, wet sand.
5. Coat the Chicken
Remove the chicken from the buttermilk mixture and coat each piece thoroughly in the flour mixture. Press the flour mixture onto the chicken to ensure it sticks, then shake off any excess. Place the coated chicken pieces on a wire rack set over a rimmed baking sheet to rest.
6. Heat the Oil
Pour peanut oil into a Dutch oven to a depth of about ¾ inch and heat it over medium-high heat until it reaches 375°F.
7. Fry the Chicken - Part 1
Carefully add the chicken pieces to the hot oil, skin side down, and cover the Dutch oven. Fry the chicken for 4 minutes.
8. Fry the Chicken - Part 2
After 4 minutes, check the chicken and rearrange the pieces if necessary to ensure even browning. Cover the Dutch oven again and continue frying for an additional 4-6 minutes, maintaining an oil temperature of around 300°F.
9. Fry the Chicken - Part 3
Uncover the Dutch oven, turn the chicken pieces over using tongs, and fry them uncovered for another 6-8 minutes until the second side is deep golden brown and crispy.
10. Drain the Chicken
Transfer the chicken to a plate lined with a triple layer of paper towels. Let the chicken sit for 5 minutes before serving to allow any excess oil to drain off.
The buttermilk soak is key to tenderizing the chicken. For an even more flavorful brine, add spices like paprika, garlic powder, and black pepper to the buttermilk. Let the chicken soak for at least 4 hours, but ideally overnight, to ensure it's moist and tender.
Season every layer. Your buttermilk brine, flour dredge, and even the final product need a good amount of salt and your chosen spices to ensure a flavorful crust.
Maintain a consistent oil temperature between 350°F to 375°F. Use a thermometer to monitor the oil. If the temperature drops too low, the coating will absorb the oil and become greasy; too high, and it will burn.
Press the flour mixture onto the surface to help create more crags and crispy bits. These irregularities in the coating will add to the crunch factor. Shake off excess flour to avoid a doughy texture.
Once cooked, transfer the chicken to a clean wire rack set over a baking sheet. This allows excess oil to drain away without making the crust soggy, which can happen if you drain on paper towels.


Comments (0)